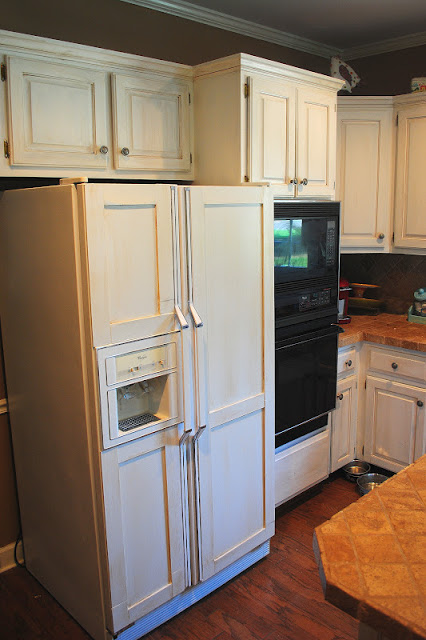
Paneled refrigerators are absolutely stunning. Before you turn your old refrigerator into a chalkboard masterpiece, you need to check this out. You no longer have to suffer with that white eye-sore staring back at you in the kitchen every day. But, how is this feat possible you may ask? We have all seen those beautiful and customized paneled refrigerators in the gleaming spotlight of a gorgeous kitchen. Those paneled refrigerators cost literally thousands of dollars for something you can easily do at home for a DIY weekend project (and save money, of course). Simply put, you can have the look of luxury without the price tag. For real. Katie, blogger of Amazing Grays, walks you through her DIY project on how she customized her refrigerator to match her cabinets (pictured above). Note: As always, disconnect your refrigerator from its electrical source to prevent safety hazards. To get that built-in look, measure the perimeter of your refrigerator, and your desired width; Katie measured 3 additional horizontal pieces for the middle of her fridge. She allotted a little bit of extra space, and ended up with 30 feet of pre-cut, flat-paneled molding she bought at her local hardware store. Using liquid nails, apply your trim pieces around your fridge and hold it in place with tape until it is dry. Katie then applied caulk to seal the seams and gaps around the molding. It’s painting time. Katie used Rustoleum paint because of the diverse color options to match her cabinetry, not to mention it’s an oil-based paint that is designed for metal applications. You will want to apply 1 coat of oil-based primer, and then apply 2 coats of Rustoleum paint, allowing each coat to dry completely. Finally, customize your look by glazing and antiquing your refrigerator with a stain to match your kitchen cabinetry. Oh, another thing we love about this—your magnets or magnetic spice rack will still stick to your refrigerator since it has only been painted on…booya! DIY Paneled Refrigerator via Amazing Grays (Photo Source: above link)


